3D printing is more accessible in the Philippines than ever. A capable printer now costs less than a mid-range smartphone, and Shopee carries everything you need to get started. This guide walks through what a complete beginner should know before buying their first machine.
What 3D Printing Actually Is
Most consumer 3D printers use a process called FDM (Fused Deposition Modeling). The printer melts plastic filament and deposits it layer by layer to build an object from the bottom up. Think of it like a very precise hot glue gun on a robotic arm.
Resin printers (SLA/MSLA) use UV light to cure liquid resin. They produce highly detailed prints but are messier and more expensive to run. For beginners, FDM is the right starting point.
What You Actually Need to Start
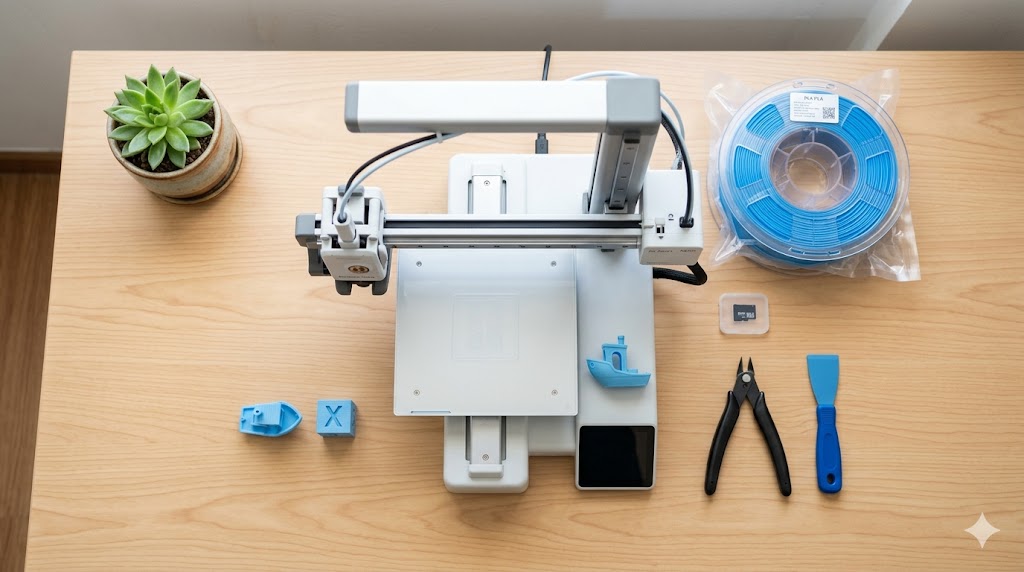
The minimum kit for a Filipino beginner:
- A 3D printer — PHP 8,000 to PHP 25,000
- A 1kg spool of PLA filament — PHP 700
- A pair of flush cutters or scissors — PHP 150
- A scraper or spatula for removing prints — usually included
- A USB stick or microSD card — usually included
Total starting cost: roughly PHP 10,000 to PHP 27,000.
Choosing Your First Printer
For most beginners in the Philippines, these are the realistic options:
Under PHP 15,000:
- Creality Ender 3 V3 SE — solid budget choice, large community (Makerlab PH)
- Bambu Lab A1 Mini (base) — also lands in this band at certain distributors (Puzzlebox 3D)
PHP 15,000 to PHP 25,000:
- Bambu Lab A1 Mini Combo — fastest path from box to good multi-color prints (Puzzlebox 3D or Makerlab PH)
- Bambu Lab A1 (base) — larger build volume
PHP 25,000 and up:
- Bambu Lab A1 Combo — A1 with AMS for multi-color (Puzzlebox 3D)
- Elegoo Neptune 4 Pro — strong specs for the price (Makerlab PH)
Stick to authorized local distributors for your first printer. The 1-year local warranty and Filipino support save serious time and money when something goes wrong. Avoid the cheapest printers on Shopee under PHP 6,000 — they often need significant tuning and the cost savings disappear when you factor in failed prints.
Where to Learn
You do not need a course. The Philippine and global 3D printing communities are very active online:
- YouTube: search for your specific printer model + "first print"
- Reddit: r/3Dprinting and r/FixMyPrint
- Facebook groups: search "3D Printing Philippines" — several active local groups for buy/sell, troubleshooting, and meetups
- Discord servers run by Bambu Lab, Creality, and others
Plan to spend a few hours watching setup videos before your printer arrives.
Your First Prints
Start with the test print included on the SD card or USB. Then move to:
- A simple calibration cube — confirms dimensions are accurate
- A Benchy (small boat) — the classic 3D printing test
- A simple keychain or phone stand from Printables or Thingiverse
Do not start with a complex multi-part model. Get a feel for what your printer can and cannot do first.
Where to Get Free Models
You do not need to design your own models to start. Free model sites:
- Printables.com — best curation, free
- Thingiverse.com — largest library, older site
- MakerWorld — Bambu Lab's library, well organized
- Cults3D — mix of free and paid
What 3D Printing Costs Per Month
A casual hobbyist in the Philippines typically spends:
- Filament: PHP 700 to PHP 2,100 (1 to 3 spools)
- Electricity: PHP 100 to PHP 400 depending on print hours
- Replacement parts: PHP 0 to PHP 500 (nozzles, build plates, etc.)
- Total: roughly PHP 800 to PHP 3,000 per month
Common Beginner Mistakes
- Buying the cheapest printer available
- Skipping bed leveling on the first print
- Storing filament in the open in a humid Philippine room
- Setting unrealistic infill (100% wastes material)
- Printing huge models before mastering small ones
When You Are Ready to Sell
Once your prints look consistently good, the next question is usually pricing. Use the PesoPrint calculator at pesoprint.com to factor in filament cost, electricity, printer wear, and your time into a real selling price.
What Comes Next
After a month or two of comfortable PLA printing, you can branch into:
- PETG for functional parts
- Multi-color printing (with AMS or manual swaps)
- Designing your own models in Tinkercad, Fusion 360, or Onshape
- Selling prints as a side income
Take it slow. 3D printing rewards patience more than money.